Storm Hedge
The ancient arcane ruins of Storm Hedge were located in an odd location in the Badlands. In the hilly region they were constructed in, they were built atop an uncharacteristically tall plateau with steep cliff facings to the southwest and northeast, creating a strangely shaped hill that had an appearance of a natural bridge in a region with otherwise naturally flowing rolling hills.
The ruins themselves were ancient and of unknown origin. Some suspected that they were built by a long gone society that worshiped the gods that sent storms to the Badlands. The site was supposedly used as a sacrificial grounds blood was spilled in an attempt to appease those unruly gods. Scot spit on the old ruins, his hubris in his own belief of the Lady blinding him to power of the relic of ages past.
He and his army had marched to this region of the Badlands to set up watchtowers and rider posts so that they would have advanced warning of any invading armies. It was also a fitting irony to bring that captured beastman named Devorator here and execute him at a shrine of his own gods, assuming of course that the beastmen did not meet the terms of ransom by the scheduled execution time.
Scot was dismounted an examining the ruins first hand, his white stallion, Keldoron, tied to the base of the shrine. With Scot was his bannerman Eddard, the prophetess Patricia (Eddard's wife), and the elite members of the King's Guard. A few hundred yards away an escort of knights and peasants waited for Scot and his party.
"Rider!" shouted Sir Turner, as he pointed to the southwest. Scot ran up to where Sir Turner was standing and peered off into the distance. A lone rider could be seen. He was riding hard, a trail of dust rising behind his horse. He had just crested a large hill near the base of the plateau and was beginning to approach the ruins.
Sir Eddard and the King's Guard unsheathed their swords, the sound of steel on leather as the swords were drawn adding a sense of tension. "Who is it!" shouted Sir Eddard, before turning to face the escorts and shouting for the knights and peasants to prepare to a possible confrontation.
"It's a yeoman..." sighed Sir Turner. With the knowledge that the rider was not a threat the tension throughout the party was relieved. The men returned their swords to the sheaths.
As the rider approached he shouted something to Scot's party, but the distance was to great to discern the exact wording. Sir Turner and Sir Beal continued to scan the horizon for whatever it was the rider was running from. "Our Lady... protect us..." said Sir Beal in a frightened voice.
The party faced southwest to see what had frightened Sir Beal. Fear also filled Scot as the sight of a beastmen horde crested the hill at the base of the plateau. Two giants and hundreds of gor-men were marching directly towards Sir Scot and his party. From the beastmen horns blasted, a warning to the Bretonnians that they were now the prey of this horde.
Swords were drawn again, but this time everyone was running to their horses. Sir Scot barked orders to his knights, "Have the peasants build stakes there and there! Move the lances to the rear! We defend these heights!"
Scot mounted Keldoron and rode him to the rear of the lines. Together the knights dismounted and prayed for the protection of the Lady of the Lake. Lady Patricia led the prayer. By the time the knights remounted the beastmen horde was already at the shrine.
"Eddard!" Shouted Scot, "Take those knights and ride them right!" Meaning the twelve knights under the wolf banner of Sir Benjin. "I need you to hold that flank!" At the command Sir Eddard rode to join those knights and led them to the right flank. Scot knew he may have just sent those men to face certain death, as a unit of Chaos Warriors marched that direction.
"You five! To the center! Keep those low born fighting!" Scot shouted to the nearby Questing Knights. "And Sir Colbert, I need you to take down that damn giant."
"It will be my honor, my Lord," replied Sir Colbert.
Scot spurred his stallion into action and joined into the melee.


I set up with the goal of having a really weak center but strong flanks, a classic pincer attack. I'm not sure what Justin's plan was exactly, but I think it was more akin to the Buffalo Horn of the Zulu, a very strong center, with only slightly weaker flanks, that all attack simultaneously and attempt an encirclement. I believe the Gor herd with the BSB was intended to be the unit that exploits a breakthrough.
So obviously I prayed, sacrificing the roll for first turn. Justin accepted the first turn.
Justin moved forward as the picture above shows. His magic phase was shot down (which seems to be a big factor throughout the game), and he had no shooting. He marched forward as much as possible, putting disposable flak in front of his more elite units.
I move up as the picture above shows (the picture is actually after his second turn movement, so ignore the beastmen and reference the picture before this for his position).
My knights all positioned themselves about 23 inches away. Too far for his units to charge, but enough that if he marched forward I would have some charges the next turn. The M@A moved such that they might do something useful later, but at this time I had no idea what they would do later. My prophetess moved outside of the KOTR unit she was in, so I wouldn't have to risk miscasts killing knights. I knew she was safe since Justin had no shooting.
My magic phase went spectacular. This seemed to be the big downside for Justin and the upside for me throughout the whole game, which can be something that sucks about fantasy. So first thing I attempt to cast is Throne of Vines, it miscasts. I roll the result of Detonation, but since no one is in base contact with her it does nothing. Then I cast Dwellers Below on his most rightward Gor unit, which also miscasts, but now that I have Throne up I ignore the miscast on a 2+. It kills 5 Gor, causing panic in them. They run through the warhounds, panicking them. His whole right flank is suddenly stalled because the Gor and warhounds land in such a way that his minotaurs can't move next turn. Really bad luck for him. I wish I could say I planned that it would work that way (I actually wanted to minotaurs to run).
So, then I do some shooting with the bowmen, they kill a few Gor, whoooo...
No combats, so onto Turn 2.
Unfortunately my little brother Drew was currently distracted by the Space Wolves Codex and thus forgot to snap some pictures here. You can kinda see his movements on his right flank, but the left is missing, so you'll need to use your imagination.
So no charges, compulsory moves has his warhounds run off the table, but the small unit of Gor that I had Dweller Below'ed rallied. He moves his right flank so that he has a charge with his Gor and Tuskgor Chariot against the bowmen, plus the Gorgon to threaten me with a flank charge. He also moved his shawman and the Gor herd with the BSB to the right flank to counter my two big units of knights heading that direction. On the left he moved his horde of un-gor foward, put a 8-9 inch gap between them and the chaos warriors, and marched the Giant into a threatening position where he would be on my bowmen next turn.
My guess is that his overall plan was just disrupted because of the issued on the right flank. He still was making a steam roller move on the center and left, but his best hope now was to make it dangerous for me to be aggressive on my left.
Again, magic betrays him. He gets off Wildform on his unit of Gor with the BSB to help them weather a possible Dweller's Below. Savage Beast of Horrors does not go off though.
No shooting, no combats, so my turn.
I attempt three charges, all three of which he holds for. The first were the KOTR with my BSB on my right flank, into his un-gor, which they made. The second was my questing knights charging the Giant in the center, which they failed (rolled a 2,2, and 1). And the third was a successful charge from my Grail Knights into the flank of his Tuskgor Chariot.
In remaining moves my KOTR with my general move to threaten a flank charge against anyone who attempts to flank my Grail Knights. The M@A move up some more to take an overrun if need be. I run the Lvl 1 wizard away so the Giant can't eat her.
In magic I get lucky again. She still had Throne of Vines up. She casts dwellers below on the 15 Gor threatening my bowmen. Goes off with irresistible force again, killing a handful of Gor. Throne of Vine protects her from the miscast again. Then I attempt Flesh to Stone on my Grail Knights, which Justin dispelled. And I made the mistake of moving my Lvl 1 too far, because she was out of range to try Awakening of Wood on the giant.
In shooting my bowmen do 4(!!!!) wounds against the Giant.
In combat, my Grail Knights run over the Tuskgor chariot and overrun into the Gor, as expected. The KOTR with the BSB also win the combat against the un-gor and chase them down. The pursue move puts them 1" away from the chaos warriors...
Turn 3.
Gorgon and Gor herd with BSB charges flank of Grail Knights. Chaos Warriors and a Tuskgor Chariot charge the KOTR in front of them. I hold in both those cases. His giant charges the bowmen, who stand and shoot, and kill it (MVP award??!!??). In remaining moves he moves his shawman to get into range to boost the Gor herd with BSB, and he brings the Gor unit and Minotaurs closer to the melee.
Magic again betrays him. He casts Wildform on the Gor, I counter with the Silver Mirror, dispelling and causing a wound against his caster. He then attempts Savage Beast, which I dispell.
No shooting.
Combat, starting with the Grail Knights.
Grail Knights still count as charging, so they wipe out the Gor herd they had overran into last turn. They also cause a few wounds to the BSB's herd and the Gorgon. They win the combat, both his units still in the combat are steadfast and hold. I combat reform to face them, bringing many more knights into the fight.
The the combat with my BSB. His chaos lord must challenge, which was accepted by my unit champion. They have a pillow fight (I sighed in relief at that). The tuskgor chariot wounds my BSB, he kills a knight. I lose, but am steadfast with the BSB so I hold. My big mistake here was combat reforming to bring more knights to bear. I should have kept the ranks, which I'll pay for next turn.
Now onto my part of turn 3, which I have a picture for!
Starting with charges. My KOTR on my far left charge that unit of Gor that had rallied. They hold. My questing knights move forward, daring the Tuskgor Chariot to charge them (oh they will regret that). Lvl 1 moves forward a bit, M@A are unsure what they should do with themselves.
Magic Phase: My lvl 4 casts Flesh to Stone on my Grail Knights and regrows a GK.
Shooting Phase: Peasant bowmen on left kill his shawman (who was left exposed after the Gor unit in front of them disappeared) and the ones on the right try to hurt the chariot and fail to do anything.
Combat Phase: KOTR with the 10 Gor kill a bunch, making them flee through the minotuars, who flee too. They fail to overrun into either unit.
Grail Knights continue the melee against the Gorgon and Gor, do a handful of wounds and wins combat. His units continue to hold. (Grail Knights are good at a grind, especially against lower strength enemies).
KOTR on the right...BSB dies. A couple of knights die. I lose the combat, and now I lost my steadfast. They run and get chased down by the chariot. I should have kept the ranks because the knights were no match against the chaos warriors in close combat. They may have held for one more combat phase if I had kept steadfast, giving me the better position next turn. The chariot pursues far enough forward to flank charge the peasants. Chaos warriors go far enough to threaten the Questing Knights.
My flank just fell apart.
Turn 4.
So as I think about what happened here, I think we may have done this wrong, but I'm not sure.
His painted tuskgor chariot charged the questing knights. For the first time I decided that it was a good idea to flee with knights. I knew his chaos warriors were going to attack too. My big mistake here was a miscalculation. There was 6" between the QK and the chariot. I thought to myself "well I roll 3d6 and add 6", and that has to beat his 3d6." I forgot to factor in his movement, which actually put my knights at a disadvantage of two inches to get away.
So I flee, and he catches them. This panics the bowmen, who run through the mountain behind them. This may have been our mistake. I know he was planning on charging them with his other chariot, so I wonder if we should have done this all differently. I'll need to check the book again, because I think we did it wrong.
So as it turned out, he makes his remaining moves with the chaos warriors and chariot to threaten my peasants.
Both his fleeing units continue to flee.
Now with combat.
My memory at this point is starting to get fuzzy. We were starting to rush to get finished, so I might mess up the actual sequence of events. I may have at this point killed the Gorgon, but I also killed some more Gor.
My turn 4 started with a charge against the fleeing gor. They must flee, so I let them flee off the table, and then redirect into the fleeing minotuars, who also must flee, and run off the table. I needed those points!
In remaining moves I move my peasant horde to face the oncoming fight. The lvl 1 joins so that I can use the crown of command.
He actually shuts down my magic phase this time, but I don't recall what I attempted to do.
In combat I kill more Gor, maybe the Gorgon this time?
Turn 5.
He charges my bowmen with a tuskgor chariot into the flank. The chaos warriors get into combat with the M@A, also the second chariot may have also.
We duke it out over with the grail knights some more. Still no resolved fight. He kills some peasants, bowmen run and die, but his chariot hits the mountain in the overrun (should that have caused something?).
During my turn 5 I mainly skip a bunch to get the game finished. More duking it out with the grail knights. Still no resolved fight. More peasants die, but they are steadfast.
Turn 6.
So we decided to ignore the rest of the board but our combats at this point. My grail knights kill some more, more peasants die. You get the drill.
Finally during my turn 6 I finish off the BSB and the last of the Gor. He kills some more peasants.
And the game ends at the end of Turn 6, Bretonnian victory. He killed something like 700 of my points (damn questing knights...) but I had killed 1700 points of his.
So what were some of the after game lessons?
1) Chaos warriors are beasts. It is better to try to beat them with static combat resolution than active when it comes to normal knights.
2) Always think a turn ahead when it comes to combat reforms.
3) Seeing how you can force fleeing units to flee off the table to gain some free points was great.
The ruins themselves were ancient and of unknown origin. Some suspected that they were built by a long gone society that worshiped the gods that sent storms to the Badlands. The site was supposedly used as a sacrificial grounds blood was spilled in an attempt to appease those unruly gods. Scot spit on the old ruins, his hubris in his own belief of the Lady blinding him to power of the relic of ages past.
He and his army had marched to this region of the Badlands to set up watchtowers and rider posts so that they would have advanced warning of any invading armies. It was also a fitting irony to bring that captured beastman named Devorator here and execute him at a shrine of his own gods, assuming of course that the beastmen did not meet the terms of ransom by the scheduled execution time.
Scot was dismounted an examining the ruins first hand, his white stallion, Keldoron, tied to the base of the shrine. With Scot was his bannerman Eddard, the prophetess Patricia (Eddard's wife), and the elite members of the King's Guard. A few hundred yards away an escort of knights and peasants waited for Scot and his party.
"Rider!" shouted Sir Turner, as he pointed to the southwest. Scot ran up to where Sir Turner was standing and peered off into the distance. A lone rider could be seen. He was riding hard, a trail of dust rising behind his horse. He had just crested a large hill near the base of the plateau and was beginning to approach the ruins.
Sir Eddard and the King's Guard unsheathed their swords, the sound of steel on leather as the swords were drawn adding a sense of tension. "Who is it!" shouted Sir Eddard, before turning to face the escorts and shouting for the knights and peasants to prepare to a possible confrontation.
"It's a yeoman..." sighed Sir Turner. With the knowledge that the rider was not a threat the tension throughout the party was relieved. The men returned their swords to the sheaths.
As the rider approached he shouted something to Scot's party, but the distance was to great to discern the exact wording. Sir Turner and Sir Beal continued to scan the horizon for whatever it was the rider was running from. "Our Lady... protect us..." said Sir Beal in a frightened voice.
The party faced southwest to see what had frightened Sir Beal. Fear also filled Scot as the sight of a beastmen horde crested the hill at the base of the plateau. Two giants and hundreds of gor-men were marching directly towards Sir Scot and his party. From the beastmen horns blasted, a warning to the Bretonnians that they were now the prey of this horde.
Swords were drawn again, but this time everyone was running to their horses. Sir Scot barked orders to his knights, "Have the peasants build stakes there and there! Move the lances to the rear! We defend these heights!"
Scot mounted Keldoron and rode him to the rear of the lines. Together the knights dismounted and prayed for the protection of the Lady of the Lake. Lady Patricia led the prayer. By the time the knights remounted the beastmen horde was already at the shrine.
"Eddard!" Shouted Scot, "Take those knights and ride them right!" Meaning the twelve knights under the wolf banner of Sir Benjin. "I need you to hold that flank!" At the command Sir Eddard rode to join those knights and led them to the right flank. Scot knew he may have just sent those men to face certain death, as a unit of Chaos Warriors marched that direction.
"You five! To the center! Keep those low born fighting!" Scot shouted to the nearby Questing Knights. "And Sir Colbert, I need you to take down that damn giant."
"It will be my honor, my Lord," replied Sir Colbert.
Scot spurred his stallion into action and joined into the melee.
Meta Notes About the Battle
A second game against Justin. This time his list contained a more solid force of Gor, a Gorgon and a gaint, and this time was led by a Chaos Lord. Here are the two army compositions:
Bretonnians
Sir Scot Schneider - 259 pts
Equipment: Armour of Agilulf, Barded Bretonnian Warhorse, Hand Weapon, The Heartwood Lance
Vow: Grail Vow
Virtue: Virtue of Heroism
Lady Patricia: Lvl 4 Lore of Life, Warhorse, Silver Mirror - 280pts
Sir Eddard Kaufman: BSB - 145 pts
Equipment: Heavy Armor, Hand Weapon, Gromril Great Helm, Barded Bretonnian Warhorse
Vow: Grail Vow
Virtue: Virtue of Purity
Damsel: Lvl 1 Lore of Life, Crown of Command - 105 pts
12 KOTR: Full Command - 312 pts
12 KOTR: Full Command - 312 pts
39 M@A: Full Command - 222 pts
16 Peasant Bowmen: Musician, Braziers - 106 pts
16 Peasant Bowmen: Musician, Braziers - 106 pts
5 Questing Knights: Full Command - 167 pts
12 Grail Knights: Full Command - 486 pts
Total: 2,500 pts
Beastmen
I do not know the exact composition of Justin's Army. I know he had:
Chaos Lord - Magic Items and Equipment Unknown
Bray-Shawman - Magic Items and Equipment Unknown - Lvl 2 Lore of Beast
Wargor - Battle Standard Bearer, Items Unknown
Gor herd - 30 Members. Full Command.
Gor herd - 15 Members
Gor herd - 15 Members
Un-gor herd - 30 Members. Full Command. Spears and Sheilds
Tuskgor Chariot
Tuskgor Chariot
Tuskgor Chariot
Chaos Warhounds - 9 Hounds
Chaos Warriors - 12 Members
Minotaurs - Five of them, with greatweapons
Giant
Gorgon
Set up
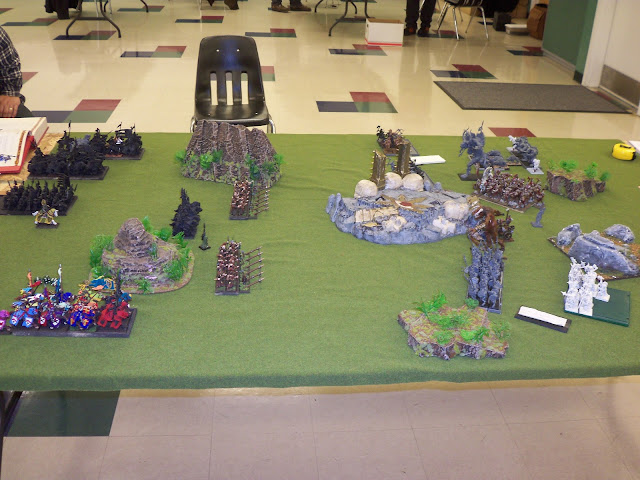
We rolled up Battle for the Pass (thus why Storm Hedge is flanked by two big cliffs). The campaign location also made the whole table count as an arcane ruin.
I won the roll to choose to set up first, which I did. See the below pictures:


I set up with the goal of having a really weak center but strong flanks, a classic pincer attack. I'm not sure what Justin's plan was exactly, but I think it was more akin to the Buffalo Horn of the Zulu, a very strong center, with only slightly weaker flanks, that all attack simultaneously and attempt an encirclement. I believe the Gor herd with the BSB was intended to be the unit that exploits a breakthrough.
The Battle
I have more pictures, but not consistently taken throughout, I'll try to intersperse where I think it helps the understanding of the battle.So obviously I prayed, sacrificing the roll for first turn. Justin accepted the first turn.

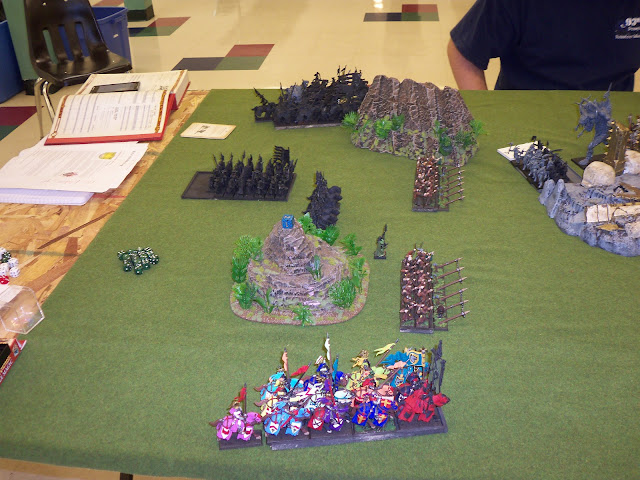
Justin moved forward as the picture above shows. His magic phase was shot down (which seems to be a big factor throughout the game), and he had no shooting. He marched forward as much as possible, putting disposable flak in front of his more elite units.

I move up as the picture above shows (the picture is actually after his second turn movement, so ignore the beastmen and reference the picture before this for his position).
My knights all positioned themselves about 23 inches away. Too far for his units to charge, but enough that if he marched forward I would have some charges the next turn. The M@A moved such that they might do something useful later, but at this time I had no idea what they would do later. My prophetess moved outside of the KOTR unit she was in, so I wouldn't have to risk miscasts killing knights. I knew she was safe since Justin had no shooting.
My magic phase went spectacular. This seemed to be the big downside for Justin and the upside for me throughout the whole game, which can be something that sucks about fantasy. So first thing I attempt to cast is Throne of Vines, it miscasts. I roll the result of Detonation, but since no one is in base contact with her it does nothing. Then I cast Dwellers Below on his most rightward Gor unit, which also miscasts, but now that I have Throne up I ignore the miscast on a 2+. It kills 5 Gor, causing panic in them. They run through the warhounds, panicking them. His whole right flank is suddenly stalled because the Gor and warhounds land in such a way that his minotaurs can't move next turn. Really bad luck for him. I wish I could say I planned that it would work that way (I actually wanted to minotaurs to run).
So, then I do some shooting with the bowmen, they kill a few Gor, whoooo...
No combats, so onto Turn 2.
Unfortunately my little brother Drew was currently distracted by the Space Wolves Codex and thus forgot to snap some pictures here. You can kinda see his movements on his right flank, but the left is missing, so you'll need to use your imagination.
So no charges, compulsory moves has his warhounds run off the table, but the small unit of Gor that I had Dweller Below'ed rallied. He moves his right flank so that he has a charge with his Gor and Tuskgor Chariot against the bowmen, plus the Gorgon to threaten me with a flank charge. He also moved his shawman and the Gor herd with the BSB to the right flank to counter my two big units of knights heading that direction. On the left he moved his horde of un-gor foward, put a 8-9 inch gap between them and the chaos warriors, and marched the Giant into a threatening position where he would be on my bowmen next turn.
My guess is that his overall plan was just disrupted because of the issued on the right flank. He still was making a steam roller move on the center and left, but his best hope now was to make it dangerous for me to be aggressive on my left.
Again, magic betrays him. He gets off Wildform on his unit of Gor with the BSB to help them weather a possible Dweller's Below. Savage Beast of Horrors does not go off though.
No shooting, no combats, so my turn.
I attempt three charges, all three of which he holds for. The first were the KOTR with my BSB on my right flank, into his un-gor, which they made. The second was my questing knights charging the Giant in the center, which they failed (rolled a 2,2, and 1). And the third was a successful charge from my Grail Knights into the flank of his Tuskgor Chariot.
In remaining moves my KOTR with my general move to threaten a flank charge against anyone who attempts to flank my Grail Knights. The M@A move up some more to take an overrun if need be. I run the Lvl 1 wizard away so the Giant can't eat her.
In magic I get lucky again. She still had Throne of Vines up. She casts dwellers below on the 15 Gor threatening my bowmen. Goes off with irresistible force again, killing a handful of Gor. Throne of Vine protects her from the miscast again. Then I attempt Flesh to Stone on my Grail Knights, which Justin dispelled. And I made the mistake of moving my Lvl 1 too far, because she was out of range to try Awakening of Wood on the giant.
In shooting my bowmen do 4(!!!!) wounds against the Giant.
In combat, my Grail Knights run over the Tuskgor chariot and overrun into the Gor, as expected. The KOTR with the BSB also win the combat against the un-gor and chase them down. The pursue move puts them 1" away from the chaos warriors...
Turn 3.
Gorgon and Gor herd with BSB charges flank of Grail Knights. Chaos Warriors and a Tuskgor Chariot charge the KOTR in front of them. I hold in both those cases. His giant charges the bowmen, who stand and shoot, and kill it (MVP award??!!??). In remaining moves he moves his shawman to get into range to boost the Gor herd with BSB, and he brings the Gor unit and Minotaurs closer to the melee.
Magic again betrays him. He casts Wildform on the Gor, I counter with the Silver Mirror, dispelling and causing a wound against his caster. He then attempts Savage Beast, which I dispell.
No shooting.
Combat, starting with the Grail Knights.
Grail Knights still count as charging, so they wipe out the Gor herd they had overran into last turn. They also cause a few wounds to the BSB's herd and the Gorgon. They win the combat, both his units still in the combat are steadfast and hold. I combat reform to face them, bringing many more knights into the fight.
The the combat with my BSB. His chaos lord must challenge, which was accepted by my unit champion. They have a pillow fight (I sighed in relief at that). The tuskgor chariot wounds my BSB, he kills a knight. I lose, but am steadfast with the BSB so I hold. My big mistake here was combat reforming to bring more knights to bear. I should have kept the ranks, which I'll pay for next turn.
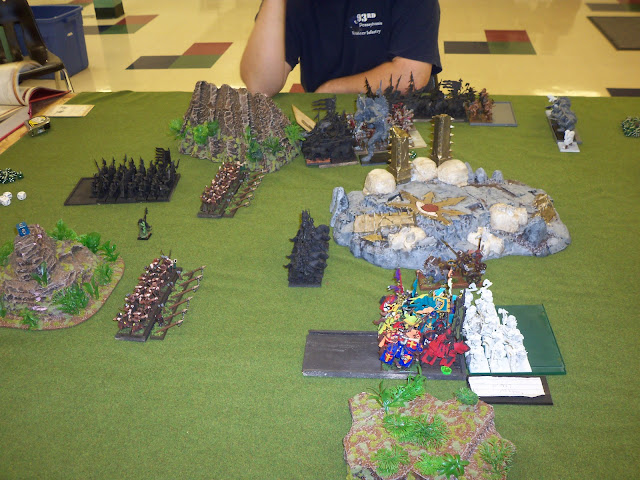
Now onto my part of turn 3, which I have a picture for!

Starting with charges. My KOTR on my far left charge that unit of Gor that had rallied. They hold. My questing knights move forward, daring the Tuskgor Chariot to charge them (oh they will regret that). Lvl 1 moves forward a bit, M@A are unsure what they should do with themselves.
Magic Phase: My lvl 4 casts Flesh to Stone on my Grail Knights and regrows a GK.
Shooting Phase: Peasant bowmen on left kill his shawman (who was left exposed after the Gor unit in front of them disappeared) and the ones on the right try to hurt the chariot and fail to do anything.
Combat Phase: KOTR with the 10 Gor kill a bunch, making them flee through the minotuars, who flee too. They fail to overrun into either unit.
Grail Knights continue the melee against the Gorgon and Gor, do a handful of wounds and wins combat. His units continue to hold. (Grail Knights are good at a grind, especially against lower strength enemies).
KOTR on the right...BSB dies. A couple of knights die. I lose the combat, and now I lost my steadfast. They run and get chased down by the chariot. I should have kept the ranks because the knights were no match against the chaos warriors in close combat. They may have held for one more combat phase if I had kept steadfast, giving me the better position next turn. The chariot pursues far enough forward to flank charge the peasants. Chaos warriors go far enough to threaten the Questing Knights.
My flank just fell apart.
Turn 4.
So as I think about what happened here, I think we may have done this wrong, but I'm not sure.
His painted tuskgor chariot charged the questing knights. For the first time I decided that it was a good idea to flee with knights. I knew his chaos warriors were going to attack too. My big mistake here was a miscalculation. There was 6" between the QK and the chariot. I thought to myself "well I roll 3d6 and add 6", and that has to beat his 3d6." I forgot to factor in his movement, which actually put my knights at a disadvantage of two inches to get away.
So I flee, and he catches them. This panics the bowmen, who run through the mountain behind them. This may have been our mistake. I know he was planning on charging them with his other chariot, so I wonder if we should have done this all differently. I'll need to check the book again, because I think we did it wrong.
So as it turned out, he makes his remaining moves with the chaos warriors and chariot to threaten my peasants.
Both his fleeing units continue to flee.
Now with combat.
My memory at this point is starting to get fuzzy. We were starting to rush to get finished, so I might mess up the actual sequence of events. I may have at this point killed the Gorgon, but I also killed some more Gor.
My turn 4 started with a charge against the fleeing gor. They must flee, so I let them flee off the table, and then redirect into the fleeing minotuars, who also must flee, and run off the table. I needed those points!
In remaining moves I move my peasant horde to face the oncoming fight. The lvl 1 joins so that I can use the crown of command.
He actually shuts down my magic phase this time, but I don't recall what I attempted to do.
In combat I kill more Gor, maybe the Gorgon this time?
Turn 5.
He charges my bowmen with a tuskgor chariot into the flank. The chaos warriors get into combat with the M@A, also the second chariot may have also.
We duke it out over with the grail knights some more. Still no resolved fight. He kills some peasants, bowmen run and die, but his chariot hits the mountain in the overrun (should that have caused something?).
During my turn 5 I mainly skip a bunch to get the game finished. More duking it out with the grail knights. Still no resolved fight. More peasants die, but they are steadfast.
Turn 6.
So we decided to ignore the rest of the board but our combats at this point. My grail knights kill some more, more peasants die. You get the drill.
Finally during my turn 6 I finish off the BSB and the last of the Gor. He kills some more peasants.
And the game ends at the end of Turn 6, Bretonnian victory. He killed something like 700 of my points (damn questing knights...) but I had killed 1700 points of his.
So what were some of the after game lessons?
1) Chaos warriors are beasts. It is better to try to beat them with static combat resolution than active when it comes to normal knights.
2) Always think a turn ahead when it comes to combat reforms.
3) Seeing how you can force fleeing units to flee off the table to gain some free points was great.

Comments
Post a Comment